Viewing Your Documents
Lesson Goals
- Learn about Document Views.
- Learn to show and hide the Navigation pane.
- Learn to use the Navigation pane to quickly get to different sections of your document.
- Learn to use the Navigation pane to reorganize your document.
- Learn to use the Navigation pane to search within your document.
- Learn to use multiple windows to view different parts of one document at the same time.
- Learn to use multiple windows to view multiple documents at the same time.
Document Views
By default, when you work in a Microsoft Word document, what you see on your screen is what you will see on paper after printing. Depending on the work you are doing and / or what the document is intended for, it is sometimes helpful to view the document in a different way. There are five Document Views, or ways to view your document while working on it:
- Read Mode. Use the Read Mode view to view your document in two columns. (In Word 2010, Read Mode is not available; instead, Full Screen Reading is an option.)
- Print Layout. Use the Print Layout view to see what the document will look like when printed.
- Web Layout. Use the Web Layout view to see what the document will look like as a Web page.
- Outline. Use the Outline view to see how your document is laid out and to make structural changes to your document.
- Draft. Use the Draft view to focus on and make quick changes to your text. Note that images and headers and footers can not be seen or edited in the Draft view.
There are two ways to change your document view in Microsoft Word:
- From the View tab in the Views group, select a view:

- Click on one of the document view icons in the Status Bar:

Viewing Document Pages Side to Side
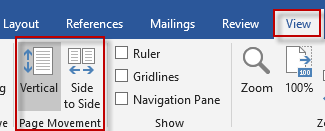
New in Word 2019 is the ability to view your document pages side to side. To do so, from the View tab, in the Page Movement group, select Side to Side. You can then select Vertical to return to the normal view. On a touch-enabled device, you can use your fingers to scroll. On a non-touch-enabled device, use the horizontal scroll bar or your mouse's wheel.
The Resume Reading Feature
The Resume Reading feature allows you to pick up in a document where you left off. To use Resume Reading, you must be working with a document that is saved on the cloud.
To use the Resume Reading feature:
- Open a document that is stored on the cloud.
- You will notice the bookmark icon on the right.
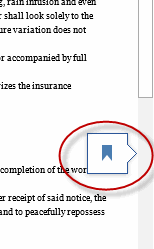
- Scroll over it and you will see the option to pick up where you left off.
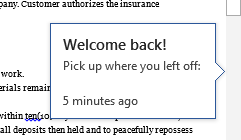
- Click the link and Word will take you to where your cursor was when you last closed the document.
Using the Navigation Pane
The Navigation pane is used to help you navigate quickly through a Word document. By default, the Navigation pane is hidden. There are two ways to open the Navigation pane:
- From the View tab in the Show group, check Navigation Pane:

- Press CTRL+F on the keyboard. This is the method to use if you are going to use the Navigation pane to search for text in your document.
The Navigation pane has three tabs, each of which is used for different purposes: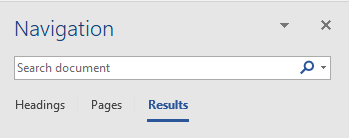
- Headings. Use this tab to see all the headings in your document and to quickly move to different section of your document. The highlighted heading shows the location of your cursor in your document. To move to another section of your document, simply click on another heading. To re-organize your document, simply drag and drop a heading from one location to another:
 Note that if you type a word or phrase in the search box while the Headings tab is selected, all the headings to sections that contain your search will become highlighted.
 - Pages. Use this tab to see all the pages in your document and to quickly move from one page to another. The highlighted page shows the location of your cursor in your document. To move to another page, simply click on it:

- Results. Use this tab to see all the results for a specific search and to quickly move from one result to another. The highlighted search result shows in the main document window. To move to a different search result, simply select it in the Navigation pane:

Use Show/Hide
The Show/Hide feature of Word is useful when editing documents, as some formatting marks are difficult to spot with formatting marks hidden.
To enable Show/Hide:
- From the Home tab, in the Paragraph group, select the Show/Hide command.

- Formatting marks are now visible within the document.

- To hide them, select the Show/Hide command again.
Using the Navigation Pane
Duration: 5 to 15 minutes.
In this exercise, you will use the Navigation pane to locate sections, pages and text within a document.
- Use the Navigation pane to quickly jump to the following sections of the document:
- Columbine
- Lamb's Ear
- Perennials
- Japanese Maple
- Use the Navigation pane to quickly jump to the following pages of the document:
- Page 4.
- Page 6.
- Page 1.
- Use the Navigation pane to answer the following questions:
- How many times does the word "butterflies" appear in the document?
- What plant description contains the words "larval host"?
- On what pages does the word "columbine" appear?
- Do the words"drought tolerant" appear under the Heading "Columbine"?
Solution:
- Open or go to Plants in my yard - Intermediate.docx. To view the Navigation pane, from the View tab in the Show group, check Navigation pane:

- On the Headings tab:
- Click on "Columbine" and note that your cursor is now in front of the heading "COLUMBINE" in the document:

- Click on "Lamb's Ear" and note that your cursor is now in front of the heading "LAMB'S EAR" in the document.
- Click on "Perennials" and note that your cursor is now in front of the heading "PERENNIALS" in the document.
- Click on "Japanese Maple" and note that your cursor is now in front of the heading "JAPANESE MAPLE" in the document.
- Click on "Columbine" and note that your cursor is now in front of the heading "COLUMBINE" in the document:
- On the Pages tab:
- Click on "Page 4" and note that your cursor is now at the top of page 4 in the document:

- Click on "Page 6" and note that your cursor is now at the top of page 6 in the document.
- Click on "Page 1" and note that your cursor is now at the top of page 1 in the document.
- Click on "Page 4" and note that your cursor is now at the top of page 4 in the document:
- Answers and solutions to the questions in the third exercise follow:
- Answer: 6.
- Click on the Results tab, type "butterflies" into the search box and then count the results:

- Click on the Results tab, type "butterflies" into the search box and then count the results:
- Answer: Butterfly weed.
- Click on the Results tab, type "larval host" into the search box to find it in the document:

- Click on the Results tab, type "larval host" into the search box to find it in the document:
- Answer: Page 3.
- Click on the Pages tab, type "columbine" into the search box and see what pages show up in the results:

- Click on the Pages tab, type "columbine" into the search box and see what pages show up in the results:
- Answer: No.
- Click on the Headings tab, type "drought transplant" into the search box. Headings that include the words "drought transplant" are highlighted:

- Click on the Headings tab, type "drought transplant" into the search box. Headings that include the words "drought transplant" are highlighted:
- Answer: 6.
- On the Headings tab:
Multiple Windows
It is sometimes beneficial to view two different parts of the same document at the same time. The two easiest ways to do this are:
- To split the window the document is in.
- To add a new window and then arrange the windows such that you can view them side by side.
You can also arrange windows to view multiple different documents at the same time.
Splitting a Window to View Different Parts of One Document in One Window
Splitting a window enables you to view different parts of one document at one time. To split a window:
- From the View tab in the Window group, click Split:

- The split line will appear in the center of your document. Click your mouse to accept that position or move your mouse up or down before clicking to change the location.
- Place your cursor above and below the split line and experiment with scrolling each section independently.
- Click Remove Split to get rid of the split line:

Open a Second Window to View one Document in Two Windows
It is possible to have the same document open in two different windows at the same time. You can then view them side by side, which makes it easy to see different parts of the document at the same time. Depending on what you are trying to accomplish, this is often more efficient than splitting the document. To view your document in two windows simultaneously:
- From the View tab in the Window group, click New Window:

- To view the two windows side by side, click View Side by Side:

- Changes you make in either window will also appear in the other window. To get back to one window, simply close one of the windows.
Arranging Windows such that All Open Windows get Equal Screen Space
If you have multiple documents or windows of one document open and want to view all at the same time, you can easily do so:
- From the View tab in the Window group, click Arrange All:

- To maximize one of the windows, simply click the Maximize box in the upper right corner of the window:

- To change the way the windows are laid out on your screen, simply drag the windows to the size you want.
Working with Multiple Windows
Duration: 10 to 20 minutes.
In this exercise, you will split, add and arrange windows in order to view multiple documents and sections of one document at the same time.
- Open or go to Plants in my yard - Intermediate.docx.
- Use the information learned in this lesson to:
- Change your document view to look like the below:

- Change your document view to look like the below:

- Open a new document and view it side by side with Plants in my yard - Intermediate.docx
- Change your document view to look like the below:
Solution:
- To split the window into two parts as shown in the first image in this exercise:
- Scroll to the top of the document.
- From the View tab in the Window group, click Split:

- Click in the center of the window:

- Place your cursor above the Split line and scroll until the section matches the corresponding section of the image in the exercise.
- Place your cursor below the Split line and scroll until the section matches the corresponding section of the image in the exercise.
- To open a new window and view it side by side with the first window as shown in the second image in this exercise:
- Scroll to the top of the document.
- From the View tab in the Window group, click New Window:

- From the View tab in the Window group, click View Side by Side (you can do this in either window):

- As Synchronous Scrolling is automatically selected when you click View Side by Side, you have to deselect it. From the View tab in the Window group, click Synchronous Scrolling (you can do this in either window):

- Scroll in each window until the windows match the corresponding windows in the image in the exercise.
- To open a new document and view it side by side with Plants in my yard - Intermediate.docx:
- First, make sure Plants in my yard - Intermediate.docx is only open in one window.
- Open a new blank document.
- From the View tab in the Window group, click View Side by Side (you can do this in either document):


Comments
Post a Comment