Working with Tables
Lesson Goals
- Learn to insert a table into a document.
- Learn to format a table using styles.
- Learn to format data within a table.
Inserting a Table
There are a few ways to insert a table into a document:
- Create your own table by selecting the cells:
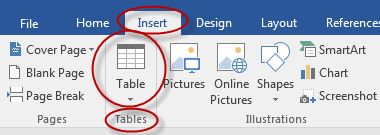
- Click Table on the Insert tab:
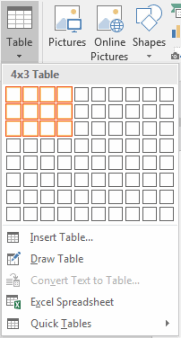
- Use your mouse to select the number of rows and columns you wish to have:
- Click Table on the Insert tab:
- Use the Insert Table dialog box:
- Click Table on the Insert tab:

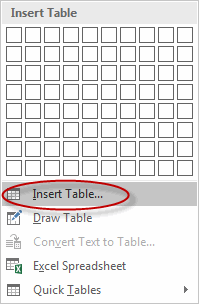
- Click Insert Table:
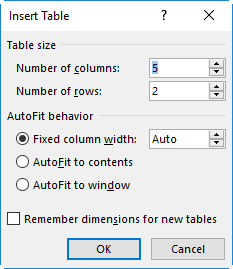
- In the Insert Table dialog box, select the number of columns and rows and the AutoFit behavior:
- Click Table on the Insert tab:
- Draw a table:
- Click Table on the Insert tab:

- Click Draw Table:
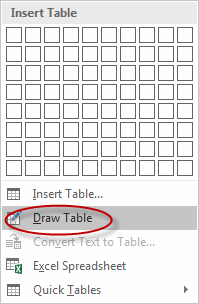
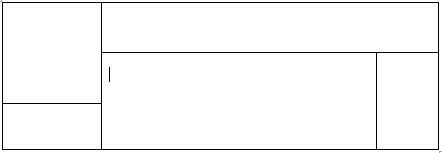
- Draw your table with your mouse. Press Escape to stop drawing (the pencil will change back to the standard cursor). This is the option to choose for a non-standard table such as the example below:
- Click Table on the Insert tab:
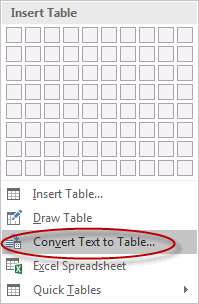
- Convert text to a table:
- Type text into a document, using tabs or commas to separate columns and lines (pressing Enter) to separate rows.
- Select the text:

- Click Table on the Insert tab:

- Select Convert Text to Table:
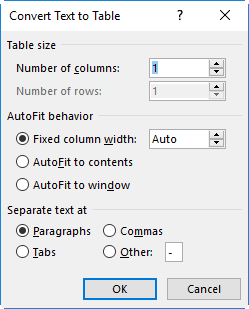
- In the Convert Text to Table dialog box, verify or change the selections and press OK:
Converting Tables to Text
As you can convert text to tables, you can also convert tables to text.
To convert tables to text:
- Select the table.
- From the Table Tools Layout tab, in the Data group, select Convert to Text.

- In the Convert Table to Text dialog box, set how you want to separate the text and click OK.
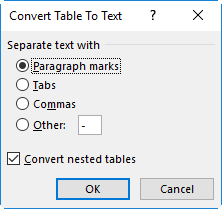
- The table is converted to text.

Adding a Table Title
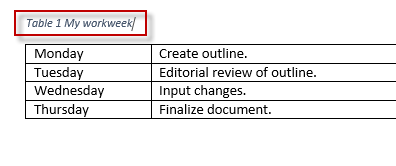
You can add a table to your title in Word in the form of a caption:
- Click in the table.
- Select the References tab, and in the Captions group, select Insert Caption.

- Type the table name in the Caption text box, and from the Label drop-down list, select Table. You can choose to display the label above or below the table.
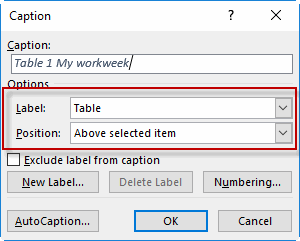
- Click OK.
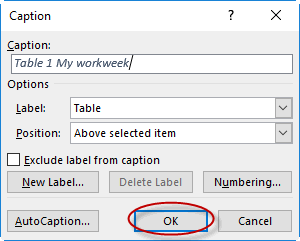
- The title is displayed.
Modifying Table Fonts
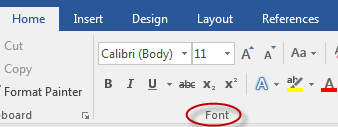
You can modify the fonts used in your table by selecting the text you want to apply a font change to, and then from the Home tab, in the Font group, setting font options.
Sorting Table Data
You can sort the data in a table:
- Select the table.
- From the Table Tools Layout tab, in the Data group, select Sort.

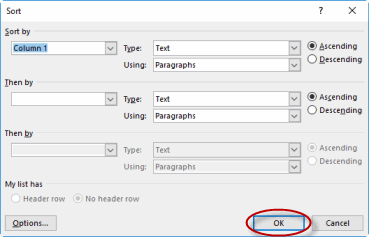
- Configure sort options in the Sort dialog box and click OK to sort the data.
Setting Cell Margins
To set cell margins in a table:
- Select the table.
- From the Table Tools Layout tab, in the Alignment group, select Cell Margins.

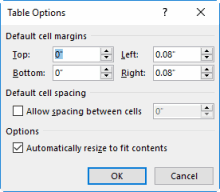
- Set margin options in the Table Options dialog box and click OK.
Modifying Table Dimensions
To modify table dimensions:
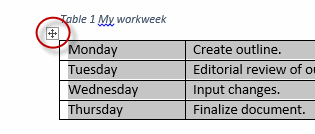
- Select the entire table by clicking the icon to the upper-left of the table.
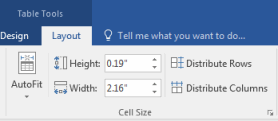
- From the Table Tools Layout tab, in the Cell Size group, set options such as modifying height of the table or using AutoFit.
Merging Cells
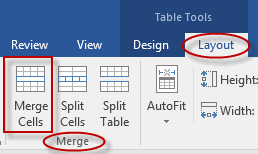
To merge cells in a table:
- Select the cells you want to merge (by pressing Shift and clicking).
- From the Table Tools Layout tab, in the Merge group, select Merge Cells.
Applying Formulas to a Table
To apply a formula to a table:
- Select the table.
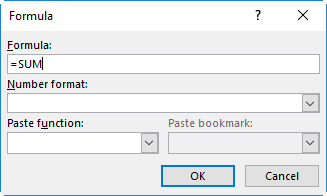
- From the Table Tools Layout tab, in the Data group, select Formula.

- In the Formula dialog box, enter a formula in the Formula text box and click OK to apply it to the table.
Ink Equations
If you are using a tablet or touch-enabled device, you can "write" equations using a stylus or your finger and Excel will convert it to text. If you are not using a touchscreen device, you can do the same using your mouse.
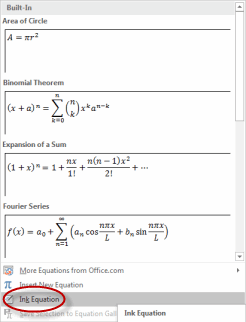
To use Ink Equations, from the Insert tab of the Ribbon, in the Symbols group, select Equation.

From the drop-down, select Ink Equations.
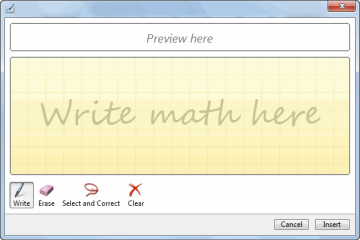
A dialog box opens where you can insert your equation and then click Insert to add it to the document.
Adjusting Column Widths in a Table
By default, columns are evenly distributed in tables in Microsoft Word. They can be adjusted in the following ways:
- Drag the column border to the left or right. This method keeps the table the same overall width. The following image shows the right side of the first column being dragged to the left, resulting in the first column getting smaller and the second larger:

- Double-click the column border. This method adjusts the column to the widest content and affects the overall table width.
Insert a Table
Duration: 5 to 15 minutes.
In this exercise, you will insert a table into a document and add data to it.
- Open or go to Plants in my yard - Intermediate.docx.
- Insert a table beneath the description of the Red Bud tree that looks like the one in the screenshot below:

- Save the document as we will continue to build on this document in future exercises.
Solution:
- Place your cursor beneath the description of the Red Bud tree.
- Press Enter until your cursor is at the top of page two (so table will appear on one page).
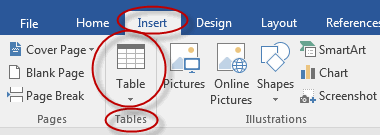
- Click Table on the Insert tab:
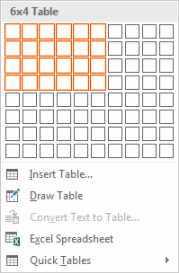
- Select six columns and four rows:
- Enter the data.
- Save the document.
Table Styles
Microsoft Word includes a wide variety of table styles you can use to quickly style your table. Whether or not you choose to use a pre-existing style, you can customize (or further customize) tables with shading and borders and by using table style options.
Table Styles
To apply a table style to your table:
- Place your cursor in your table to bring up the Design tab:

- Hover over the Table Styles to see what your table will look like if you select that style.
- Click on one of the table styles to apply it to your table.
Table Style Options
The options in the Table Style Options group make it easy to add emphasis to rows or columns and to choose whether or not rows and columns will be banded.
- When Header Row is checked, Word displays a selection of tables with header rows:

- When Total Row is checked, Word displays a selection of tables with total rows:

- When Banded Rows is checked, Word displays a selection of tables with banded rows:

Shading and Borders
To apply shading and borders to your table:
- Select a cell, group of cells or the whole table.
- To add shading:
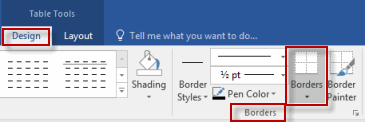
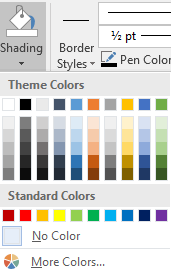
- On the Design tab, in the Table Styles group, click Shading:

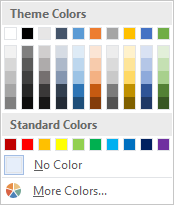
- Click the color of your choice:
- On the Design tab, in the Table Styles group, click Shading:
- To add borders:
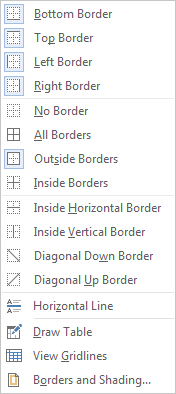
- On the Design tab, in the Borders group, click the Borders drop-down arrow:
- Click the border option of your choice:
- On the Design tab, in the Borders group, click the Borders drop-down arrow:
Adding Styles to a Table
Duration: 5 to 15 minutes.
In this exercise, you will use many of the tools on the Design tab to style a table.
- Open or go to Plants in my yard - Intermediate.docx.
- Customize the table you created in the prior exercise so that it looks like the picture below:

- Hint: the rows are banded and the header row is shaded.
- Save the document as we will continue to build on this document in future exercises.
Solution:
- Place your cursor in the table.
- On the Design tab, in the Table Style Options group, check Header Row, First Column, and Banded Rows:

- In the Table Styles group on the Design tab, select the Plain Table 1 option:

- Select the top row in the table:

- Click Shading and choose a color:
- Select the whole table:

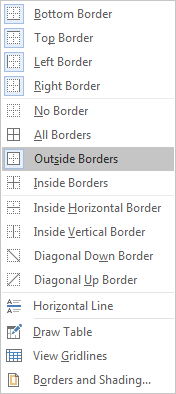
- Click Borders and then Outside Borders:
- Save the document.
Formatting a Table
Tables in Microsoft Word, and the data within them, can be customized in many ways. We cover a few of the more common ways below.
Inserting Columns and Rows in Tables
To insert a column or row in a table in Microsoft Word:
- Place your cursor in a cell adjacent to where you want to add a column or row.
- On the Table Tools Layout tab, in the Rows & Columns group, click the Insert option that accomplishes your goal:

Deleting Columns and Rows in Tables
To delete a column, row or cell in a table in Microsoft Word:
- Place your cursor in the column, row or cell you wish to delete.
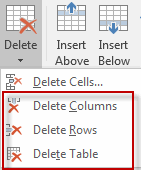
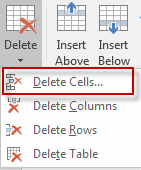
- On the Table Tools Layout tab, in the Rows & Columns group, click Delete:

- To delete a column or row, or to delete the whole table, select that option:
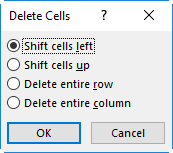
- To delete a cell or cells, click Delete Cells:
 Then choose whether the remaining cells should shift left or shift up, and click OK:
- To delete a column or row, or to delete the whole table, select that option:
Splitting a Table
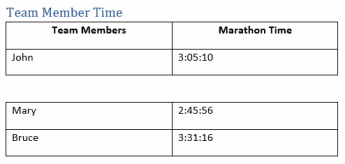
You can split a table in Word into multiple tables. To split a table:
- Put your cursor in the table in the first cell within the row where you want the new table to begin.
- From the Table Tools Layout tab, from the Merge group, select Split Table.
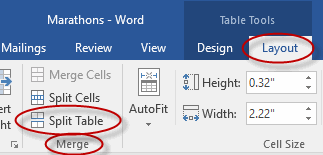
- The table is now split into two tables.
Configuring a Repeating Row Header
You may want your row header in your table to repeat at the top of each new page in Word. To configure a repeating row header:
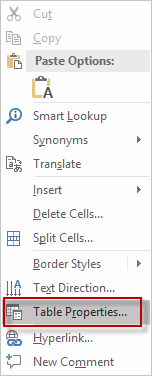
- Right-click in header row of the table and select Table Properties.
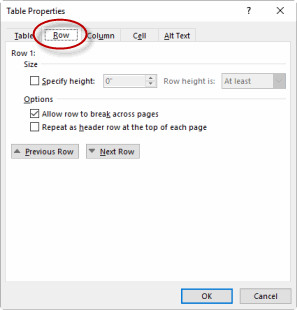
- Select the Row tab from the Table Properties dialog box.
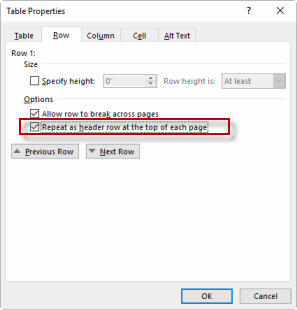
- Check the Repeat as header row at the top of each page checkbox.
Aligning Text in Tables
The text in each cell within a table can be aligned left, right, and center and also top, bottom and center. To align text in tables:
- Select the cell or cells for which you wish to adjust the alignment.
- On the Table Tools Layout tab, in the Alignment group, click the alignment option of your choice:

The direction of the text in each cell is left to right by default, but can be changed to top to bottom and bottom to top. To change the direction of text in a cell:
- Select the cell or cells for which you wish to adjust the text direction.
- On the Table Tools Layout tab, in the Alignment group, click Text Direction:

- Click Text Direction once to set the direction to top to bottom.
- Click Text Direction twice to set the direction to bottom to top.
Formatting a Table
Duration: 5 to 15 minutes.
In this exercise, you will add a column to a table, align the text in cells within a table, and otherwise format the table to improve its look and feel.
- Open or go to Plants in my yard - Intermediate.docx.
- Further customize the table you worked on in the prior exercise so that it looks like the picture below:

- Save the document as we will continue to build on this document in future exercises.
Solution:
- Place your cursor in the right-most column of the table and in the Table Tools Layout tab, locate the Rows & Columns group and click Insert Right:

- Type "Keep Tree in Yard?" in the top right cell:

- Select the cells in the body of the table and click Align Top Center:

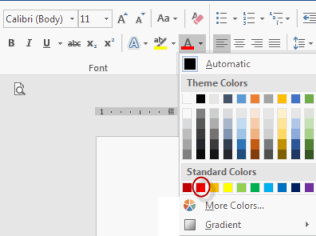
- With the cells still selected, go to the Home tab and in the Font group, click the Font Color drop-down arrow and select red:
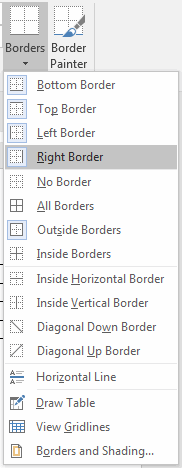
- Select the cells in the left most column and go to the Table Tools Design tab and in the Borders group, click Borders and select Right Border:
- Save the document.
Comments
Post a Comment